Your Cart is Empty
Winter Sale! Shop Now > |Free USA Shipping On Orders Over $75!

The mattress stitch is arguably the best way to seam handknit projects. Whether we're talking sweater pieces or blocks for an afghan, mattress stitch joins pieces simply and beautifully. This tutorial is especially timely for those who've been participating in the Building Blocks and Building in Color groups. I know several of the ladies in the Tuesday evening Open Knitting Group are doing one or both of those and several of them haven't done mattress stitch before. This tutorial is for you! Shelly recently brought her Building Blocks pieces in to our Tuesday group to show off and get some help with putting everything together.

Shelly putting together her Building Blocks afghan. Doesn't it look good?
If you've never done mattress stitch before, take a deep breath and gather your supplies. It's really pretty easy, and I know you'll be pleased with the results. For our tutorial today I'll be piecing a baby sweater I'm making for my new son. It's the Little Luxury Kimono. This is knit from an Aran weight wool yarn that I had in my stash. I've lost the ball band, so I can't tell you what it is. But, I'd recommend knitting it in something like Malabrigo Twist if you don't mind handwashing or Berroco Vintage if you want something easier to care for.

Sweater back and right front.
1. Lay out the pieces you'll be seaming together. Cut a piece of yarn a little longer than the pieces you'll be seaming.

The bar between two columns of stitches.
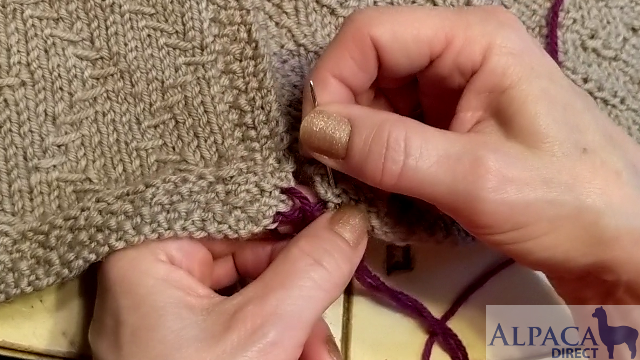
2. On the right hand piece, find the bar between the two columns of stitches on the edge of the piece. Pull the yarn through, leaving a six inch tail.

Yarn through the right hand piece, and finding the bar on the left hand piece.
3. Find the bar between the two edge columns on the left hand piece. Pull the yarn through, loosely attaching the two pieces.

Loose mattress stitch.
4. Continue in the same way, attaching each row and only pulling the pieces loosely together.

Mattress stitch pulled snug.
5. After you've sewn an inch or so, hold the tail of the yarn and pull the working yarn so that the two pieces come together side by side. You want them to be snug, but not tight. It should look seamless on the right side (there will be a visible seam on the wrong side). Continue with the mattress stitch until you've seamed the two pieces together, pulling the yarn snug after each stitch. If you accidentally pull it too tight and cause the work to pucker, just smooth it out along the seam until it lays flat and smooth.

Mattress stitch seam, right side.

Mattress stitch seam, wrong side.
You can do mattress stitch on two pieces of knitting vertically, as well as side by side. This works well for shoulder seams or for two blocks stacked on top of each other, rather than next to each other. It's slightly different than the side by side mattress stitch and not quite as seamless, but still provides a nice seam.

Back and left front at the shoulder.
1. Lay out the pieces you'll be seaming next to each other. I like to lay the pieces out so I'll be seaming from bottom to top rather than side to side. When you seam pieces vertically, you seam the columns of stitches to each other, rather than the bars between columns. So you'll need to choose whether to choose the column oriented as a V or an A. Make sure you choose the same column on each piece.

A column

V column

2. Choose your column on one piece. I chose a V column. Pull the yarn through.

3. Choose the corresponding column on the other piece. Pull the yarn through, pulling the two pieces snug.

Completed shoulder seam with mattress stitch, right side.

Completed shoulder seam with mattress stitch, wrong side.
Here's a video on how to seam these blocks with the Mattress Stitch
There you have it! Now, you can confidently seam your handknits together. Have you tried the mattress stitch before? Will this be your first time? Let us know how it goes!

Comments will be approved before showing up.


