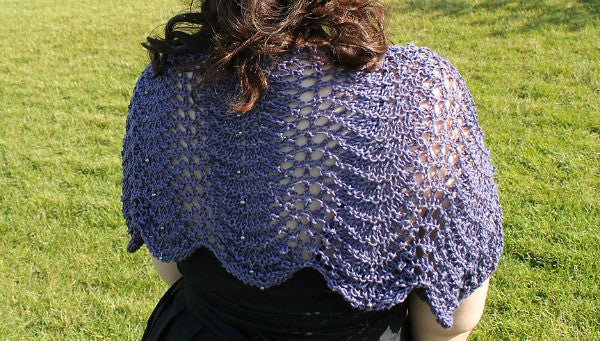
A note from Kathleen: I love this blog about knitting a gorgeous shawl based on the Old Shale lace pattern. Old Shale is a classic that's perfect for beginning lace knitters, and designer Meghan Bosanko used it to make her lovely beaded shrug.

She used Cascade Ultra Pima in her version, which we don't carry anymore. Any DK-weight yarn will work though—may I suggest Tosh DK in Lepidoptra? It's a lovely variegation of purplish reds and blues. 

Or the super-popular Bamboo Pop would be perfect, and we have a bunch of gorgeous colors!

Download Meghan's Cristaria FREE shrug pattern, and read on for her wonderful tutorial about how this shrug works. 

The Cristaria Shrug Tutorial

Named for a pearl mussel that produces freshwater pearls, the Cristaria shrug is a quick, pretty knit shrug that complements formal summer ensembles or casual looks alike. Add beads or pearls for a piece that is truly your own!

Materials:

  • 100 g DK yarn
  • US 10 circular needles, 20˝ or longer
  • About 25 freshwater pearls (optional)
  • About 25 head pins (optional)
Stitch abbreviations:
  • yo— yarn over
  • k2tog— knit 2 stitches together
Directions &  Hints: Cast on 108 stitches, leaving at least a 12˝ tail. This will seem longer than it needs to be, but don’t fret! Take a look at the picture to the right. Imagine taking your straight cast-on edge and bending it into the wavy bottom edge of the shrug. That’s why your finished piece won’t be anywhere near as wide as it seems now.
  • Row 1: knit across
  • Row 2: purl across
Here comes the exciting part: the lace row. This sequence of increases and decreases is what turns a fairly ordinary stitch pattern into something visually interesting (and, in this case, wavy!). During each repeat, you are going to decrease a total of 6 times (the k2tog stitches) and increase a total of 6 times (the yarn overs). So, even though you’re subtracting stitches in some places and adding them in others, your total stitch count at the end of each row should always be the same (108, to be precise).
  • Row 3: k2tog 3 times, *k1, yo* 6 times, k2tog 3 times. Place stitch marker. Repeat across row 5 more times.
Phew! Take a step back and congratulate yourself— you just finished the tricky part and I bet it looks like a rat’s nest, doesn’t it? Just remember: you’re taking a wavy row and straightening it out onto your needle, so it really should look a bit confused.
  • Row 4: knit across

And that’s really all there is to it! You’ll repeat those 4 rows about 14 more times, depending on how big around you’d like your armholes. To finish, bind off and break yarn, leaving at least a 12˝ tail.


Don't panic when your work-in-progress looks bunchy!

Diving in Deeper: The lace row sure does have a lot of counting— wouldn’t it be a lot easier to use more markers? A tempting proposition, no? Normally, I prefer to use markers like big red flags to remind me when it’s time to change stitches. In this pattern, though, the markers are smack dab in the middle of a bunch of k2togs!

There is method to my madness (well, this time, at least…). This is an atypical lace pattern in that the increases are all bundled together and the decreases are all bundled together. A more regular (rectangular) pattern usually peppers them across the row in pairs. Because of this, if you plunk down markers willy-nilly, they will actually migrate across the row and mess you up!

So, the short answer is that markers are only useful to a point on this pattern. Think of them more as error correction tools— if you end up with anything other than 18 stitches between markers, you know something has gone wrong in that section. The “short answer?” That didn’t seem very short at all. Out of morbid curiosity, what was the long answer? Plate tectonics!

Excuse me? No, really! The stitch markers show you the center of a double-sided stitch “subduction” zone— basically a stitch gobbler. It’s like the stitch markers are hovering over very aggressive black holes that pull stitches in and make them disappear.

Conversely, in the middle of each increase section (right after the 3rd yarn over, to be precise) is a “mid-ocean ridge” of stitches—a place where new stitches bubble up to the surface and spread out. If you placed a stitch marker at each of these spots, you could imagine them hovering over tiny stitch factories, creating new stitches and pumping them outward. The whole row would look something like this: 


Which, to me, looks a whole lot like this: 


Wow, this is really getting out of hand. Anything else you’ve been dying to get off your chest? Well, since you asked… The idea for how and where to use stitch markers (as a way to catch and isolate mistakes instead of to tell you when to change stitches) came from the mathematical basis for error-correcting code. Also, the function y(x) = 2.5 cos (2π x/13), with x and y in centimeters, describes each row of this pattern. Whee!

Finishing: String a single freshwater pearl onto each of about 25 head pins. Trim pin ends and bend into loops. Attach pins at the bottom of the soft U-shaped rows of the center 3 columns of stitches (see picture), or use whatever arrangement strikes your fancy.

Use reserved yarn tails to attach corners of finished piece to create armholes. Weave in ends and trim. Now throw it over a sundress and go put Audrey Hepburn to shame.


Ready to turn your screen off and start knitting? Download Cristaria Shrug tutorial for a printable version of this post, or Download Cristaria Shrug pattern for a no-nonsense, 1-page printable pattern.

XOXOXOXO, Meg :)

This shrug was knitted with Cascade Yarns Ultra Pima in Heathered Pansy #3705.
© 2011 Meghan Bosanko

Kathleen Cubley
Kathleen Cubley


8 Responses

Kathleen Cubley
Kathleen Cubley

July 31, 2017

Hi Geri. The pattern is written for DK-weight yarn, which is what Bamboo Pop is. The gauge is really loose, because the pattern is lacy, and when it’s blocked the pattern will show up beautifully. I hope this helps!

Geri
Geri

July 20, 2017

I purchased the bamboo pop yarn but it is not working on the size 10 needles. It’s too fine. What needle size would work best and would I have to double the cast on stitches.

Jonas Lykins
Jonas Lykins

October 05, 2016

Jonas Lykins

Very neat blog post.Much thanks again. Really Cool.

Doreen peluso
Doreen peluso

October 05, 2016

Need help

Doreen peluso
Doreen peluso

October 05, 2016

What size is finished shrug sm med, large

Doreen peluso
Doreen peluso

October 05, 2016

What size is the finished shrug?

Melissa Burnett
Melissa Burnett

October 05, 2016

Doreen,
The finished size is the same for S, M and L. It is customizable by sewing more or less of the edge after knitting. Create a larger opening for a size L by sewing just the edges together and a smaller opening by sewing a few inches and creating a size S. If your size is outside of S, M and L you might want to add a pattern repeat to create plus sizes or take a repeat out to create even smaller sizing.

If you need a size that is only SLIGHTLY smaller or larger, consider going down or up a needle size!

Regina H.
Regina H.

October 05, 2016

Thanks. A lovely way to use the Shetland ‘Old Shale’ (aka Old Shell) lace pattern. Actually, using markers in the appropriate place in the pattern can help. Old Shale is an 18 stitch, 4 row repeat. Understanding the rhythm of the stitches and using the markers after each 18 stitch repeat can help the knitter just beginning to dabble in simple lace to be successful. Learning to ‘read’ your stitches in knitting is a definite bonus and leads not only to completed projects but adventure in tackling new ones. There is a popular shawl pattern on Ravelry which uses Old Shale. Almost all of the problems addressed on the help board for the pattern are solved by stitch markers. To learn more about Old Shale read the Northern Lace blog at: http://northernlace.wordpress.com/2010/03/12/feather-and-fan-versus-old-shale/

Now, to buy beads and make this for a Christmas present!

Leave a comment

Comments will be approved before showing up.


Also in Alpaca Direct Blog

Kelley's Favorite Free Knit Sweater Patterns

by Meg Bateman January 02, 2022 1 min read

Do you feel lost when it comes to picking out your first knit sweater pattern? This week, Kelley shared her favorite sweater patterns during Technique Tuesday. These patterns all feature minimal seaming, have detailed instructions, and have lots of completed projects on Ravelry! 


Free Beginner Sweater Patterns to Try

Kelley has knit the Brick Sweater several times, and has decided to knit it again with all our Technique Tuesday viewers! Grab some worsted weight yarn and join us for this informal knit along. 

Read More
Christmas Gifts for Knitters & Loved Ones

by Meg Bateman January 02, 2022 1 min read

Do you have a knitter in your life that you would love to give a gift to? Not only do knitters love receiving knitted items, but you can get them some essential knitting supplies and tools as well!
Read More
How to Use the Fix-A-Stitch

by Meg Bateman January 02, 2022 1 min read

Do you struggle with fixing your knitting mistakes or dropped stitches? Kelley loves the Fix-A-Stitch tools! They're uniquely made to make it very easy to quickly fix your knitting mistakes. Here, Kelley demonstrates how to use the Fix-A-Stitch to fix stockinette, purl stitches, and garter stitch using the Fix-A-Stitch tools. 
Read More