Your Cart is Empty



I reinforce thin alpaca heels before holes form, keeping the yarn loose so the socks stay soft and stretchy. I wash and dry the sock first, then extend the repair 1/4 to 1/2 inch beyond the worn area into sound fabric.
I choose the repair based on what I see:
My goal is support without bulk. I match the yarn’s weight and care needs, secure the ends without knots, and <u>check the fit before trimming</u>. After washing and drying, I check again for tight spots, loose ends, or new wear.
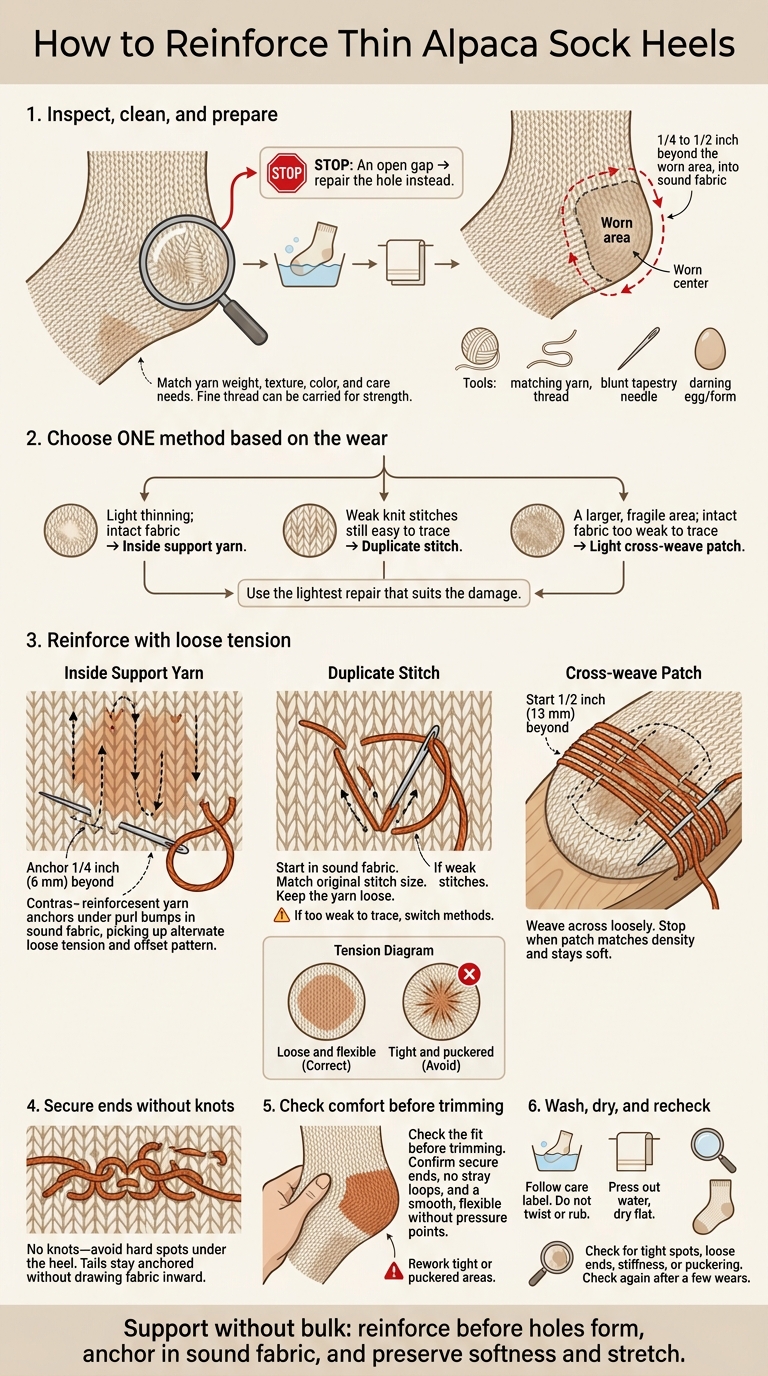
How to Reinforce Thin Alpaca Sock Heels
Turn the sock inside out and look for thin, stretched stitches at the heel. If the yarn has opened into a gap, you need a hole repair - not reinforcement.
Mark the repair edge 1/4 to 1/2 inch beyond the worn area, where the stitches are still sound. Use removable thread or a washable marker that you’ve tested on a hidden spot. Keep the heel relaxed as you mark it; don’t pull it tight. Then wash the sock and gather your tools.
Follow the care label, wash gently, and let the sock dry completely. You’ll need matching yarn, a fine reinforcement thread, a blunt tapestry needle, and a darning egg, wooden form, or drinking glass. The form holds the heel firm and helps keep the needle from catching both layers.
Choose yarn that matches the original’s weight, texture, color, and care needs. For extra strength without much bulk, carry a fine reinforcement thread alongside the main yarn.
Use the lightest repair that suits the damage.
| Method | Best use | Visibility | Durability | Stretch retention | Likely bulk |
|---|---|---|---|---|---|
| Inside support yarn | Light thinning; intact fabric | Nearly invisible from the right side | High | Good with loose tension | Low |
| Duplicate stitch | Knit stitches still easy to trace | Nearly invisible if the yarn matches | Very stable | Moderate | Moderate |
| Cross-weave darning | Intact fabric too fragile to trace | Visible woven patch | Very high | Low | Low to moderate |
For thin heels, choose one repair method that matches the wear. Start with the least visible option, moving to a more structural repair only if needed.
Turn the sock inside out. Anchor the support yarn by weaving it under several sound purl bumps, starting at least 1/4 inch (6 mm) beyond the worn area in sound fabric.
Work up and down in adjacent columns, picking up alternate bumps in each column to keep the support stitches offset. Leave the yarn loose, and stop when the reinforcement matches the surrounding fabric.
Use this method only when the knit stitches are still easy to trace.
Work on the outside of the sock, starting in sound fabric. Bring the needle up at the base of the first V-shaped stitch. Pass it from right to left under both legs of the stitch directly above, then return through the starting point.
Bring the needle up at the base of the next stitch and repeat. Work row by row across the weak area and surrounding sound fabric, matching the size of each original stitch. Keep the yarn loose. If the original stitches are too weak, switch methods.
Place the heel on a form without stretching it. Run the darning thread back and forth in one direction across the thin area, starting about 1/2 inch (13 mm) beyond the worn spot’s border. Keep the thread loose.
Weave across the base strands, passing the thread over and under them. Reverse the over-under order on each row. Stop when the patch matches the surrounding fabric’s density and stays soft.
Leave the ends accessible for finishing.
Once the repair is in place, secure the yarn tails in undamaged fabric before testing the fit. Turn the sock inside out and thread each tail through several intact purl bumps beyond the repair. Then reverse direction through adjacent purl bumps. Skip knots - they can leave hard spots under your heel.
Remove the darning form and gently stretch the heel by hand. Check that the tails stay anchored without drawing the fabric inward. Turn the sock right side out, and trim the ends ONLY after you’ve confirmed they’re secure and there are no stray loops.
Try on the sock. The repaired heel should slide over your foot and feel smooth and flexible, with no pressure points. Smooth small uneven spots with your fingers. If any part stays tight or puckered, undo it and rework it.
After the first fit test, wash the sock to help the repair settle. Follow the care label. If you’re hand-washing, don’t twist or rub the sock. Press out the water with a towel, then dry it flat. The heel should dry smooth, not stiff.
Once the sock is dry, check the tails and make sure the heel still feels smooth and flexible. Rework any stiff or puckered areas before regular wear.
Reinforce the heel before holes form, while the stitches are still intact. Keep the repair light, soft, and flexible, with as little bulk as possible. Choose the lightest reinforcement that supports the heel without changing its drape.
Use just enough yarn to restore support, and anchor it in sound fabric beyond the worn spot. Preserve the sock’s original stretch, softness, and comfort so the heel still feels like a sock, not a patch.
Check the repaired heel after washing and again after a few wears. Look for new fraying, broken strands, or areas that have started to thin.
Yes. For best results, use a dedicated reinforcement thread to strengthen high-friction areas like heels and toes without adding unnecessary bulk. A strand of matching sock yarn also works.
For repairs, duplicate stitch is often the most stable choice for plant-based yarns, while weaving works especially well for wool-based fibers.
You only need to mend the thinning area, but reinforcing both heels can save you another repair soon. Both socks face similar wear and friction, so the second heel may start thinning shortly after the first. Reinforcing both helps your socks hold up longer. Check them regularly for thinning fabric so you can strengthen weak spots before holes form.
Reinforce high-friction areas as you knit by carrying a reinforcement thread alongside your main yarn. A durable yarn blend containing nylon or wool also helps resist abrasion.
If your finished socks start thinning, darn the worn area before it becomes a hole. Rotate between several pairs to reduce wear on each and help them hold their shape and stay intact.

Comments will be approved before showing up.










