Your Cart is Empty
Summer Sale! Shop Now > |Free USA Shipping On Orders Over $75!


A messy knitting space wastes time, leads to duplicate purchases, and can ruin yarn. I fix that with one simple setup: keep active projects close, move backup stock out of the way, track what I own, and reset the space in 5–10 minutes a day.
Here’s the whole system in plain English:
A few facts stand out. The guide suggests a daily 5–10 minute tidy and a weekly 20–30 minute reset. It also points out that natural fibers like wool and alpaca need sealed storage to help guard against moths and carpet beetles, and that direct sunlight can fade dye lots over time.
If I had to sum it up in one line, it’s this: keep daily-use supplies within arm’s reach, and give everything else one clear home.
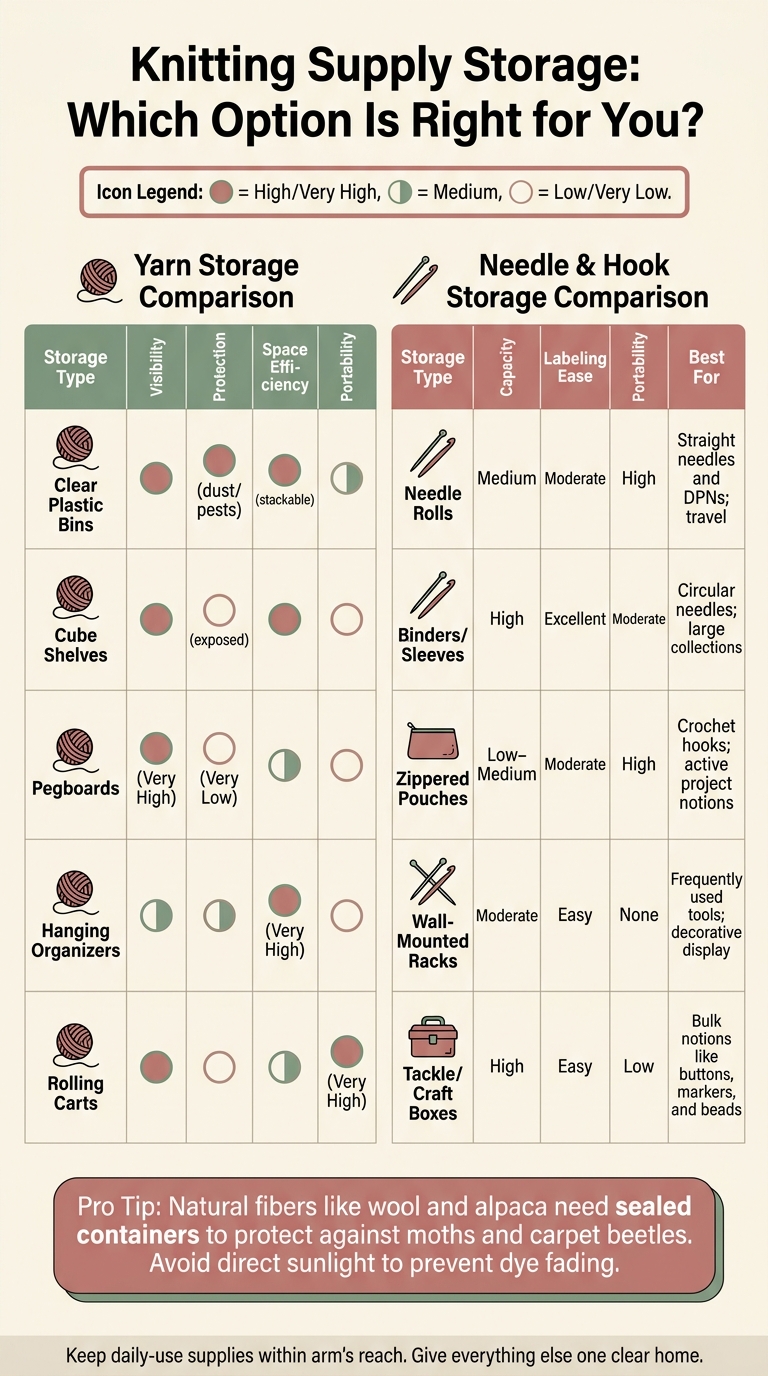
Yarn & Knitting Supply Storage Options Compared
After your main work area is set, move the rest of your yarn into one storage system. Pull every skein, ball, and scrap into one spot first so you can see the full size of your stash. Then put ONLY your active-project yarn back in the main work area. Everything else should go through a simple first pass: keep, donate, or scrap yarn.
Once the extra yarn is out of the way, sort what stays based on how you'll use it. Start with weight, then fiber, then color. That order makes the most sense because patterns are written for specific weights.
It also helps to split the stash by status: project quantities, leftovers, and reserved yarn. Label each bin or bag with the fiber content, weight, yardage, and dye lot so you don't end up with mystery yarn later and can plan projects faster. Keep the original ball band when you can. If it's gone, write the details on a card and store it with the yarn.
Your best storage setup depends on three things: how much room you have, how big your stash is, and how much protection your yarn needs. Natural fibers like wool and alpaca attract moths and carpet beetles, so sealed containers or clear bags inside lidded bins should be your main line of defense. Cedar balls or lavender sachets can still help, but they shouldn't do the heavy lifting on their own.
For delicate fibers like alpaca yarn, skip vacuum-sealing. Too much compression can flatten the soft halo and change the texture for good. A safer move is to place skeins in clear zip-top bags and then store those bags inside lidded plastic bins. That gives you protection without harming the fiber. Keep those bins out of direct sunlight too. UV light can fade dye lots over time.
| Storage Type | Visibility | Protection | Space Efficiency | Portability |
|---|---|---|---|---|
| Clear Plastic Bins | High | High (dust/pests) | High (stackable) | Medium |
| Cube Shelves | High | Low (exposed) | High | Low |
| Pegboards | Very High | Very Low | Medium | Low |
| Hanging Organizers | Medium | Medium | Very High | Low |
| Rolling Carts | High | Low | Medium | Very High |
Your inventory system should take less than a minute to update. If it feels like homework, you probably won't keep up with it. A basic notebook or spreadsheet with yarn name, fiber, weight, color, yardage, dye lot, amount left, and project is enough for most stashes. That simple record helps you avoid buying duplicates and shows you what you already have.
Before you buy yarn for a new project, check the inventory first. When you finish a project or end up with leftovers, weigh them right away and update the record so the stash stays accurate. It helps to keep a scale and your notes near your winding area. That way, recording leftover yardage becomes part of the routine instead of one more thing to do later.
Once the stash is logged, organize the needles, hooks, and notions that match it.
Once your yarn is logged, turn to the tools that go with it. Pull out every needle, hook, and notion before you put anything away. That makes it much easier to spot duplicates, worn pieces, and missing sizes.
Sort the main pile by type first. For needles, split them into straights, circulars, double-pointed needles (DPNs), and interchangeable sets. If a needle or hook has worn-off markings, check it with a needle gauge before storing it. Then make a simple master list or spreadsheet, so you don't keep buying the same sizes twice.
Start with needles and hooks. After that, sort the smaller notions that belong with them.
Give each tool one clear home. It sounds basic, but that's what saves time later.
For straight needles, keep each pair together with a rubber band and a paper label. Then group them by size range in a tall tin or a drawer with dividers. For circular needles, a 3-ring binder with clear plastic page protectors is one of the easiest setups to live with. Label each sleeve with the needle size and cable length, and coil the cables loosely so they don't kink. DPN sets usually stay together best with a rubber band and a size label, stored upright in a mason jar or a pencil box sorted by size.
Crochet hooks fit well in a zippered pouch or pencil case arranged from smallest to largest. If your hooks are metal, a magnetic strip or board keeps them in sight and easy to grab. Interchangeable sets are the one thing you usually shouldn't move around much. Keep them in the original manufacturer case so the tips, cables, and connectors stay matched.
Small notions vanish fast if they don't have a set place. A divided tackle box or bead organizer works well for stitch markers, tapestry needles, cable needles, point protectors, and row counters. Label each compartment so items don't drift into the wrong section.
Magnetic tins are handy for metal items like darning needles and locking markers because they stay put instead of sliding around. For very small pieces, like spare buttons or beads, 4 oz spice jars are a low-cost fix that works well.
It also helps to keep two kits:
That way, you don't have to dig through your main supply every time you're in the middle of a project. Keep the setup simple enough that you'll use it every day.
The best storage format depends on two things: how many tools you own and whether you knit mostly at home or on the go. Wooden or ergonomic needles and hooks usually do best in a binder or leather folio, which helps protect the finish.
| Storage Type | Capacity | Labeling Ease | Portability | Best For |
|---|---|---|---|---|
| Needle Rolls | Medium | Moderate | High | Straight needles and DPNs; travel |
| Binders/Sleeves | High | Excellent | Moderate | Circular needles; large collections |
| Zippered Pouches | Low to Moderate | Moderate | High | Crochet hooks; active project notions |
| Wall-Mounted Racks | Moderate | Easy | None | Frequently used tools; decorative display |
| Tackle/Craft Boxes | High | Easy | Low | Bulk notions like buttons, markers, and beads |
If you mostly knit at home and have a large collection, a binder plus a divided craft box is a strong combo. If you travel often or keep supplies in project bags, a needle roll with a zippered pouch keeps things compact without making tools hard to find.
With tools sorted, you can file patterns and build each project packet faster.
Once your supplies are in order, the next thing to get under control is your patterns and project records.
If you skip this step, projects tend to drift. A pattern ends up in one place, the yarn in another, and your notes vanish into a random scrap of paper. Then you come back two weeks later and have to play detective.
Paper patterns are easy to manage in three-ring binders with clear plastic sheet protectors. They keep pages safe and make patterns simple to flip through. Add tabbed dividers to sort patterns into groups like sweaters, socks, blankets, or even by season. That way, you can get to the section you want without digging through a pile.
Digital patterns need the same kind of order, just in a different form. Use searchable tags in cloud folders, and tag files by craft type, yarn weight, fiber, and difficulty. That makes them much easier to pull up when you need them. You can also use PDF annotations to keep charts, sizing notes, and pattern changes in one place instead of scattering them across different apps or scraps of paper.
| Storage Method | Searchability | Portability | Space Use | Cost |
|---|---|---|---|---|
| Binders | Medium (via dividers) | High (individual binders) | Medium (shelf space) | Low |
| File Boxes | Low (manual browsing) | Low (bulky) | High (floor/closet) | Low |
| Digital Folders | High (search/tags) | Very High (cloud/mobile) | Zero (digital) | Zero to Low |
When a pattern moves from “maybe someday” to active project, put it in a project bag with the matching yarn and tools. That small habit saves a lot of time later.
Keep each project in one labeled bag or bin so the pattern, yarn, tools, and notes stay together. The label should include the pattern name, yarn, color, dye lot, tool size, gauge, and finish date.
Inside the bag, add an index card or a small notebook page. Use it to track:
This is a lifesaver when a project sits untouched for a while. Instead of rereading the whole pattern and trying to guess where you left off, you can glance at your notes and get moving again.
Store any technique links with that same project record too. If the help you need lives somewhere else, it’s only a matter of time before it gets lost.
Save each tutorial link with the pattern so the whole project stays self-contained. You can jot a short note on your index card, write the link on a printed pattern, or paste it into your digital pattern file. The point is simple: keep it right where you’ll need it.
Alpaca Direct's YouTube channel is a useful place to save technique tutorials and weekly show content alongside specific patterns. If a project uses an unfamiliar cast-on or stitch pattern, find the matching video first and store it with that project’s records so it stays easy to find.
Once your yarn, tools, and project files are set up, a few small habits help keep everything in good shape. The goal isn't to make more work for yourself. It's to stop clutter from creeping back in.
The end of each session is the best time for a quick 5–10 minute tidy. Put needles and hooks back in their cases, pegboard, labeled drawers, or project bags. Return yarn to its labeled bin or dedicated project bag. Then update your row count or project notes before you call it a day. A clear work surface makes the next session feel a lot easier.
Once a week, spend 20–30 minutes on a fuller reset. Refile any loose patterns, pull stray stitch markers and notions out of project bags, and make sure anything new you picked up has a set place to go.
Seasonally, clear out broken tools, remove unused yarn, and check for pests so stored yarn, especially natural fibers, stays protected.
That same routine also helps you catch what needs to be replaced before you begin a new project.
Pay attention to the small items that disappear fastest from notion kits and project bags. That usually means:
Check that list before starting anything new so a missing tool doesn't stop you halfway through.
Log new yarn right away so your inventory stays current. For restocks and project ideas, use Alpaca Direct for yarn, needles, hooks, patterns, notions, and YouTube tutorials.
The best setup is one you can stick with. Keep storage visible, protect yarn, sort tools by size, and keep each active project together with its yarn, tools, pattern, and notes in labeled bins, project bags, pattern files, and inventory logs. Add a short daily tidy, a weekly reset, and a seasonal review, and the whole system is much easier to keep up over time.
Prioritize vertical storage if you're working with a small space. Hanging organizers and wall shelves get supplies off your main work surface, which gives you more room to actually make things. Clear, stackable bins also help a lot because you can see what's inside at a glance while keeping everything neat and protected.
For tools you use all the time, keep them close with wall-mounted racks or magnetic strips. That way, you're not digging through drawers every five minutes. For yarn, the bag-in-bin method is a smart setup. It helps protect the fibers and keeps skeins sorted without turning your stash into a mess.
Store natural-fiber yarn in a cool, dark closet or cabinet, away from direct sunlight. Sun can fade color and weaken the fibers over time.
Make sure the yarn is clean before you put it away. To help keep moths off, use cedar blocks, lavender sachets, or dried rosemary. Skip mothballs - they’re toxic and leave odors that tend to stick around.
Lidded containers can help guard against dust and pests, but make sure there’s still a bit of airflow so moisture doesn’t build up.
Track the basics you need to identify yarn and plan projects: brand and product line, colorway, fiber content, yarn weight, total yardage, and number of skeins.
If your stash is on the larger side, add the dye lot too. That helps you keep colors consistent, which can save you a headache later.
You don’t need a fancy system. A notebook, notes app, or spreadsheet works just fine. The key is to keep it up to date after each purchase or finished project.

Comments will be approved before showing up.


